
Textured Thank You Notes
Stampin' Up! Supplies
Paper:
- Crumb Cake: 8-1/2" x 5-1/2", scored at 4-1/4"
- Basic Beige: 4" x 5-1/4" (inside piece); second smallest and fourth smallest rectangle cut from Textured Notes dies; scrap 2-1/4" x 2-1/4"
- Woven Textures Designer Series Paper (DSP): 4" x 5-1/4"
- Early Espresso: 4-1/4" x 2"
Stamps, Ink and Dies:
- Textured Notes Bundle
- Elements of Text Stamp Set
- Mossy Meadow ink pad
- Pecan Pie ink pad
Other:
- Mini Corrugated 3D Embossing Folder
- Adhesive-Backed Metallic Gems
- Multipurpose Liquid Glue
- Stampin' Dimensionals
- Natural Tones Linen Thread
Instructions
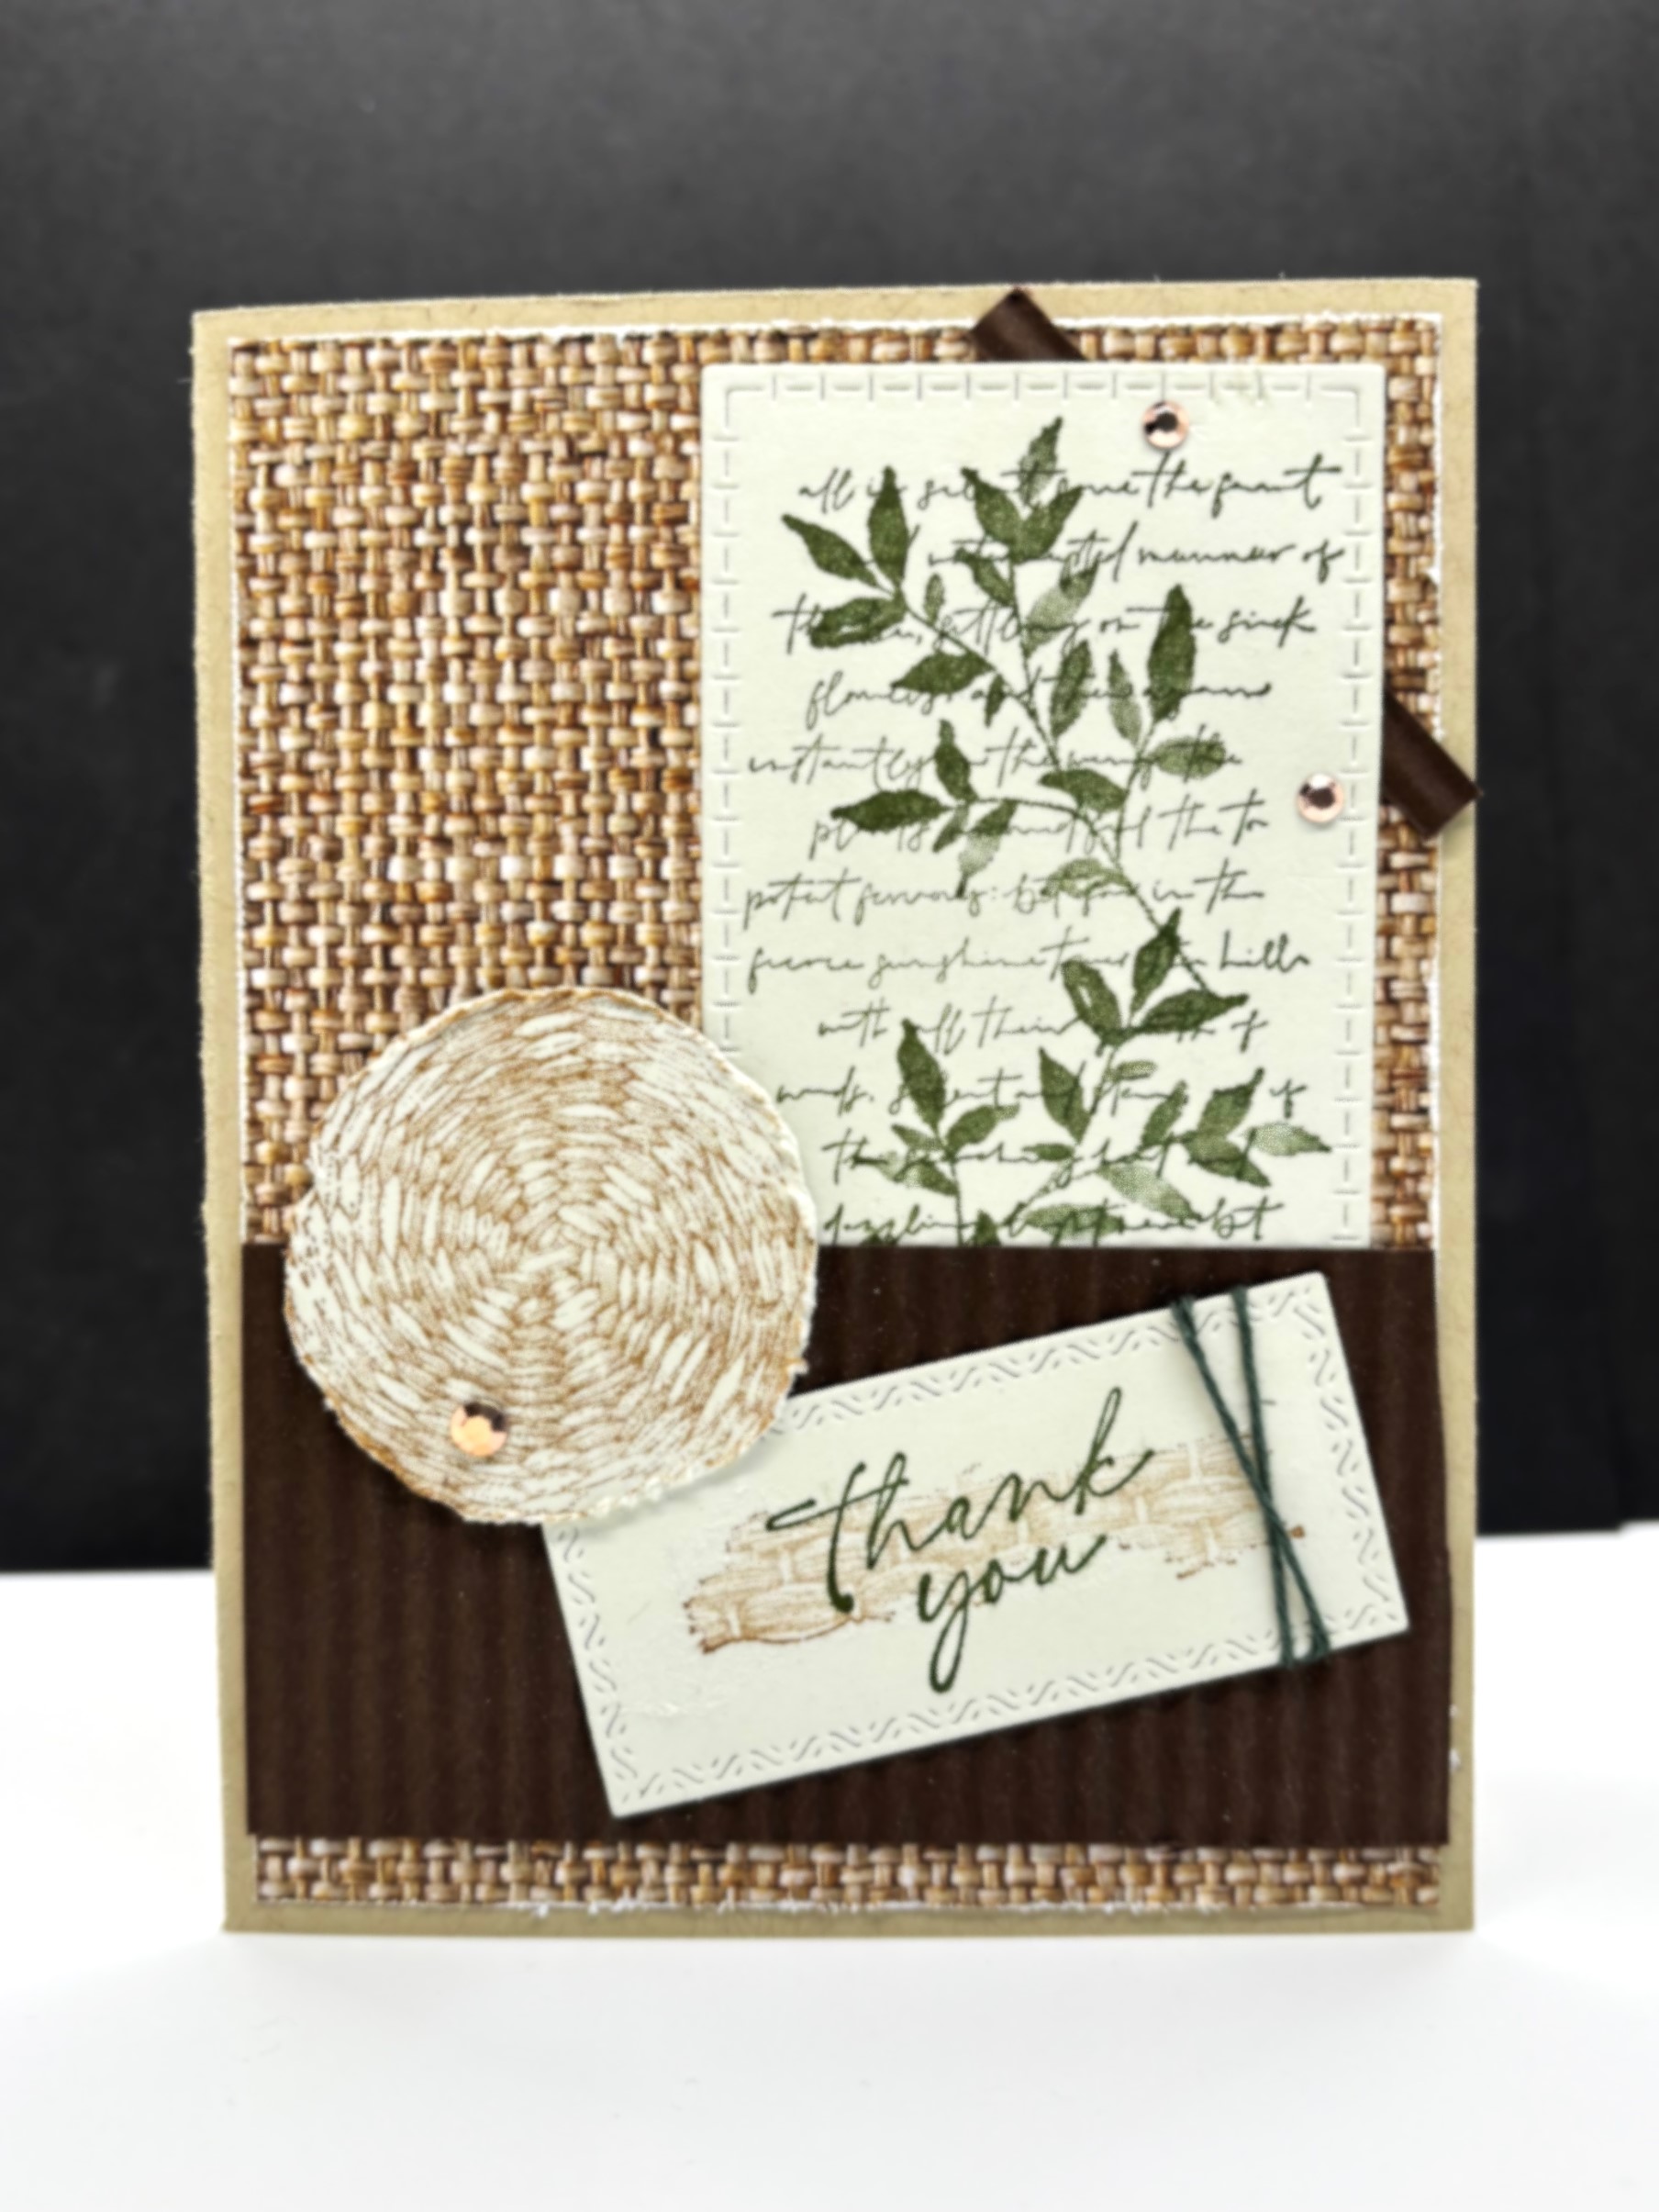
- Rough the edges of the DSP with the edge of a scissors. Glue it to the card front.
- Die cut Basic Beige with the fourth and second smallest rectangles.
- Stamp the larger rectangle with a Elements of Text stamp. Stamp it toward the top and use Mossy Meadow ink. Also stamp the leaves twice with Mossy Meadow ink.
- Stamp the smaller rectangle with the woven length using Pecan Pie ink. Then stamp "Thank you" with Mossy Meadow ink.
- Stamp the square Basic Beige scrap with the woven circle stamp. Use Pecan Pie ink.
- Fussy cut the circle out. Rough the edges with a scissors to give it even more texture.
- Emboss the Early Espresso piece with the Corrugated 3D Embossing Folder. Place it in the folder so that the corrugation ends up vertically on the card. Cut 1/4" off the end.
- Tape the 1/4" corrugated piece behind the upper, right-hand corner of the large die cut piece. Glue the die cut piece on the right-hand side of the card front.
- Glue the corrugated piece across the card front, leaving about a 1/4" of the DSP showing.
- Wrap the "Thank you" piece with Mossy Meadow natural tones linen thread. Glue the piece at an angle on the card front.
- Add the round piece using glue on the bottom and Stampin' Dimensionals on the top part.
- Add three Adhesive-backed metallic gems.
Click on any of the pictures below to see details about the products used in this card. The link will go directly to my online store.
Product List
![Crumb Cake 8-1/2" X 11" Cardstock [ 120953 ]](https://assets1.tamsnetwork.com/images/EC042017NF/120953s.jpg "Crumb Cake 8-1/2\" X 11\" Cardstock [ 120953 ]")
![Woven Textures 12" X 12" (30.5 X 30.5 Cm) Designer Series Paper [ 165560 ]](https://assets1.tamsnetwork.com/images/EC042017NF/165560s.jpg "Woven Textures 12\" X 12\" (30.5 X 30.5 Cm) Designer Series Paper [ 165560 ]")
![Basic Beige 8 1/2" X 11" Cardstock [ 164511 ]](https://assets1.tamsnetwork.com/images/EC042017NF/164511s.jpg "Basic Beige 8 1/2\" X 11\" Cardstock [ 164511 ]")
![Early Espresso 8-1/2" X 11" Cardstock [ 119686 ]](https://assets1.tamsnetwork.com/images/EC042017NF/119686s.jpg "Early Espresso 8-1/2\" X 11\" Cardstock [ 119686 ]")
![Textured Notes Bundle (English) [ 165556 ]](https://assets1.tamsnetwork.com/images/EC042017NF/165556s.jpg "Textured Notes Bundle (English) [ 165556 ]")
![Elements Of Text Cling Stamp Set [ 164774 ]](https://assets1.tamsnetwork.com/images/EC042017NF/164774s.jpg "Elements Of Text Cling Stamp Set [ 164774 ]")
![Mossy Meadow Classic Stampin' Pad [ 147111 ]](https://assets1.tamsnetwork.com/images/EC042017NF/147111s.jpg "Mossy Meadow Classic Stampin' Pad [ 147111 ]")
![Pecan Pie Classic Stampin' Pad [ 161665 ]](https://assets1.tamsnetwork.com/images/EC042017NF/161665s.jpg "Pecan Pie Classic Stampin' Pad [ 161665 ]")
![Adhesive Backed Metallic Gems [ 163780 ]](https://assets1.tamsnetwork.com/images/EC042017NF/163780s.jpg "Adhesive Backed Metallic Gems [ 163780 ]")
![Mini Corrugated 3 D Embossing Folder [ 165559 ]](https://assets1.tamsnetwork.com/images/EC042017NF/165559s.jpg "Mini Corrugated 3 D Embossing Folder [ 165559 ]")
![Multipurpose Liquid Glue [ 110755 ]](https://assets1.tamsnetwork.com/images/EC042017NF/110755s.jpg "Multipurpose Liquid Glue [ 110755 ]")
![Stampin' Dimensionals [ 104430 ]](https://assets1.tamsnetwork.com/images/EC042017NF/104430s.jpg "Stampin' Dimensionals [ 104430 ]")
![Natural Tones Linen Thread [ 164071 ]](https://assets1.tamsnetwork.com/images/EC042017NF/164071s.jpg "Natural Tones Linen Thread [ 164071 ]")
![Stampin' Cut & Emboss Machine [ 149653 ]](https://assets1.tamsnetwork.com/images/EC042017NF/149653s.jpg "Stampin' Cut & Emboss Machine [ 149653 ]")


For even more inspiration, be sure to sign up for my mailing list. I'll let you know when there is free shipping, the last chance list is updated, new products are introduced, what the current class schedule is and more. Sign up here: https://dashboard.mailerlite.com/.../12268064141528.../share
Need supplies? Connect to my online Stampin' Up! store here: https://marythiel.stampinup.net
You can follow Mary Go Round cards on Facebook! It will help me grow my small business and I will greatly appreciate it. https://www.facebook.com/MaryGoRoundcards
Check out my current in-person classes on this blog
Follow Mary Go Round cards on Pinterest.
Subscribe to my You Tube channel:
Need a catalog or have a question email me at: marygoroundcards@gmail.com
See you next time!
Mary


No comments:
Post a Comment