
Light the Year - All is Bright

images © Stampin' Up!
Stampin' Up! Supplies
Paper:
- Basic White Thick: 8-1/2" x 5-1/2", scored at 4-1/4", scraps
- Regal Distressed Patterns Specialty: 4" x 5-1/4"
- Gold Foil Sheets: 4-1/8" x 3-3/8", scrap
Stamps, Dies and Ink:
- Light the Year Stamp Set
- Unbounded Love Dies
- Spotlight on Nature Dies
- Cherry Cobbler Classic Ink Pad
- Shaded Spruce Classic Ink Pad
- Lemon Lolly Classic Ink Pad
- Lemon Lolly Stampn' Blends Combo Pack
Other:
- Gold and Silver 1/8" Trim Combo Pack
- Small Blending Brushes
- Multipurpose Liquid Glue
- Stampn' Dimensionals
- Paper Trimmer
- Stampn', Cut & Emboss Machine
Instructions
- Cut the three cover panels. In the middle of the gold panel die cut the 3-1/4" Spotlight on Nature Circle and the Unbounded Love Sentiment Box. This saves gold paper.
- Stamp Shaded Spruce candle and bow. Stamp small lantern and "All is Bright" in Cherry Cobbler.
- Die cut lantern, bow, candle and sentiment box.
- Use a blending brush with Lemon Lolly on the lantern to achieve a candle glow. It may turn a little orange from the Cherry Cobbler and that is okay. Do the same thing with Lemon Lolly on the sentiment box.
- Color the candle flame with a marker.
- Adhere the DSP panel to the gold panel.
- Punch a hole in the top of the lantern.
- Glue the bow to the lantern, leaving a little space to thread the ribbon through. Glue the candle to the lantern.
- Tape the gold sentiment box frame to the white sentiment box on the back.
- Thread the gold ribbon through the punched hole of the lantern and tape it to the back.
- Attach the lantern to the circle with Stampin' Dimensionals.
- Attach the circle to the double panel with Stampin' Dimensionals.
- Tape the other end of the lantern ribbon to the back of the double panel.
- Tape a 6" piece of ribbon about 3/4" from the bottom of the double panel.
- Use Stampin' Dimensionals to attach the sentiment over the ribbon. Place the mini-dimensionals (or cut larger ones to be smaller) in the corners.
- Adhere the double panel to the card front.
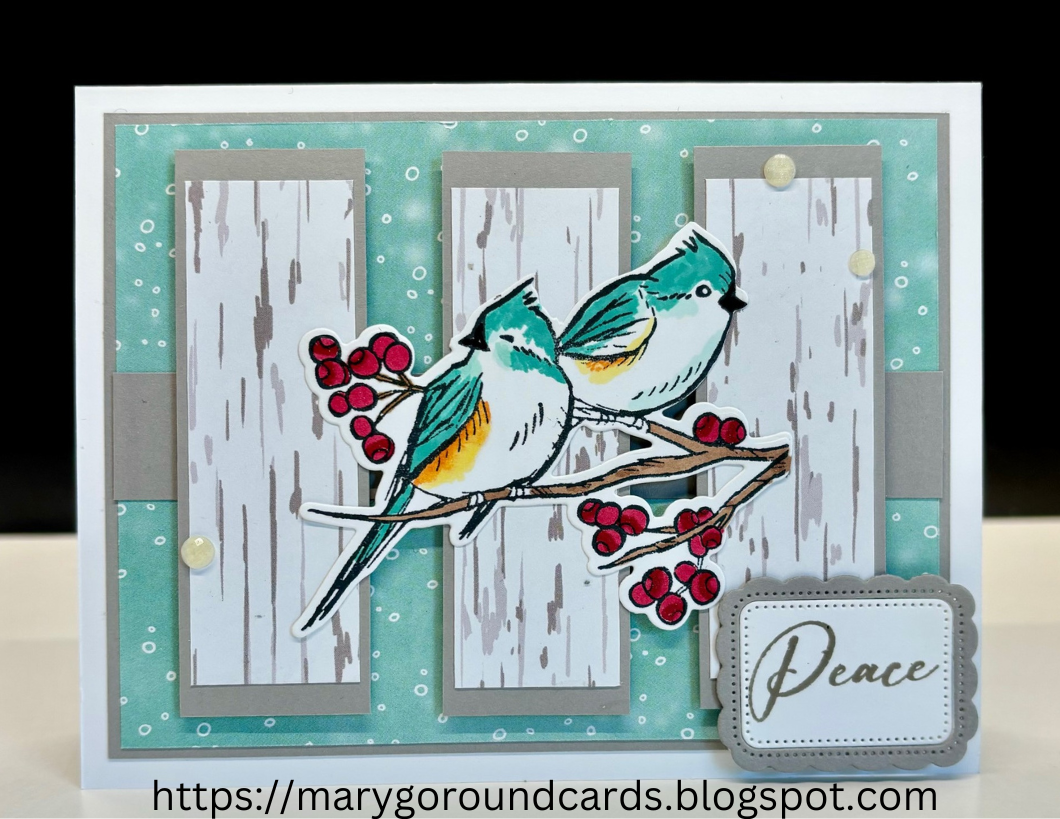
Alternative Cards

images © Stampin' Up!
These alternative cards use Pretty Peacock Cardstock (#150880), Pretty Peacock Stamp Pad (#150083), and Cherry Cobbler Cardstock (#119685).
For even more inspiration, be sure to sign up for my mailing list. I'll let you know when there is free shipping, the clearance rack is updated, new products are introduced, what the current class schedule is and more. Sign up here: https://dashboard.mailerlite.com/.../12268064141528.../share
Need supplies? Connect to my online Stampin' Up! store here: https://marythiel.stampinup.net
Click on any of the pictures below to see details about the products used in this card. The link will go directly to my online store.
Product List
![Regal Distressed Patterns 12" X 12" (30.5 X 30.5 Cm) Specialty Designer Series Paper [ 164037 ]](https://assets1.tamsnetwork.com/images/EC042017NF/164037s.jpg "Regal Distressed Patterns 12\" X 12\" (30.5 X 30.5 Cm) Specialty Designer Series Paper [ 164037 ]")
![Basic White 8 1/2" X 11" Thick Cardstock [ 159229 ]](https://assets1.tamsnetwork.com/images/EC042017NF/159229s.jpg "Basic White 8 1/2\" X 11\" Thick Cardstock [ 159229 ]")
![Gold Foil Sheets [ 132622 ]](https://assets1.tamsnetwork.com/images/EC042017NF/132622s.jpg "Gold Foil Sheets [ 132622 ]")
![Light The Year Bundle (English) [ 164092 ]](https://assets1.tamsnetwork.com/images/EC042017NF/164092s.jpg "Light The Year Bundle (English) [ 164092 ]")
![Spotlight On Nature Dies [ 163580 ]](https://assets1.tamsnetwork.com/images/EC042017NF/163580s.jpg "Spotlight On Nature Dies [ 163580 ]")
![Unbounded Love Dies [ 163383 ]](https://assets1.tamsnetwork.com/images/EC042017NF/163383s.jpg "Unbounded Love Dies [ 163383 ]")
![Cherry Cobbler Classic Stampin' Pad [ 147083 ]](https://assets1.tamsnetwork.com/images/EC042017NF/147083s.jpg "Cherry Cobbler Classic Stampin' Pad [ 147083 ]")
![Shaded Spruce Classic Stampin' Pad [ 147088 ]](https://assets1.tamsnetwork.com/images/EC042017NF/147088s.jpg "Shaded Spruce Classic Stampin' Pad [ 147088 ]")
![Lemon Lolly Classic Stampin' Pad [ 161666 ]](https://assets1.tamsnetwork.com/images/EC042017NF/161666s.jpg "Lemon Lolly Classic Stampin' Pad [ 161666 ]")
![Lemon Lolly Stampin’ Blends Combo Pack [ 161673 ]](https://assets1.tamsnetwork.com/images/EC042017NF/161673s.jpg "Lemon Lolly Stampin’ Blends Combo Pack [ 161673 ]")
![Gold & Silver 1/8" (3.2 Mm) Trim Combo Pack [ 161633 ]](https://assets1.tamsnetwork.com/images/EC042017NF/161633s.jpg "Gold & Silver 1/8\" (3.2 Mm) Trim Combo Pack [ 161633 ]")
![Small Blending Brushes [ 160518 ]](https://assets1.tamsnetwork.com/images/EC042017NF/160518s.jpg "Small Blending Brushes [ 160518 ]")
![Multipurpose Liquid Glue [ 110755 ]](https://assets1.tamsnetwork.com/images/EC042017NF/110755s.jpg "Multipurpose Liquid Glue [ 110755 ]")
![Stampin' Dimensionals [ 104430 ]](https://assets1.tamsnetwork.com/images/EC042017NF/104430s.jpg "Stampin' Dimensionals [ 104430 ]")
![Paper Trimmer [ 152392 ]](https://assets1.tamsnetwork.com/images/EC042017NF/152392s.jpg "Paper Trimmer [ 152392 ]")
![Stampin' Cut & Emboss Machine [ 149653 ]](https://assets1.tamsnetwork.com/images/EC042017NF/149653s.jpg "Stampin' Cut & Emboss Machine [ 149653 ]")

You can follow Mary Go Round cards on Facebook! It will help me grow my small business and I will greatly appreciate it. https://www.facebook.com/MaryGoRoundcards
See you next time!
Mary


![Lost Lagoon 8-1/2" X 11" Cardstock [ 133679 ]](https://assets1.tamsnetwork.com/images/EC042017NF/133679s.jpg "Lost Lagoon 8-1/2\" X 11\" Cardstock [ 133679 ]")
![Pretty Peacock 8-1/2" X 11" Cardstock [ 150880 ]](https://assets1.tamsnetwork.com/images/EC042017NF/150880s.jpg "Pretty Peacock 8-1/2\" X 11\" Cardstock [ 150880 ]")
![Basic White 8 1/2" X 11" Cardstock [ 159276 ]](https://assets1.tamsnetwork.com/images/EC042017NF/159276s.jpg "Basic White 8 1/2\" X 11\" Cardstock [ 159276 ]")
![Winter Meadow 12" X 12" (30.5 X 30.5 Cm) Designer Series Paper [ 162133 ]](https://assets1.tamsnetwork.com/images/EC042017NF/162133s.jpg "Winter Meadow 12\" X 12\" (30.5 X 30.5 Cm) Designer Series Paper [ 162133 ]")
![Silver 12" X 12" (30.5 X 30.5 Cm) Foil Sheets [ 163387 ]](https://assets1.tamsnetwork.com/images/EC042017NF/163387s.jpg "Silver 12\" X 12\" (30.5 X 30.5 Cm) Foil Sheets [ 163387 ]")
![Pretty Peacock Classic Stampin’ Pad [ 150083 ]](https://assets1.tamsnetwork.com/images/EC042017NF/150083s.jpg "Pretty Peacock Classic Stampin’ Pad [ 150083 ]")
![Greatest Adventure Cling Stamp Set (English) [ 164369 ]](https://assets1.tamsnetwork.com/images/EC042017NF/164369s.jpg "Greatest Adventure Cling Stamp Set (English) [ 164369 ]")
![Reindeer Fun Bundle (English) [ 164044 ]](https://assets1.tamsnetwork.com/images/EC042017NF/164044s.jpg "Reindeer Fun Bundle (English) [ 164044 ]")
![Stylish Shapes Dies [ 159183 ]](https://assets1.tamsnetwork.com/images/EC042017NF/159183s.jpg "Stylish Shapes Dies [ 159183 ]")
![Perennial Postage Dies [ 162607 ]](https://assets1.tamsnetwork.com/images/EC042017NF/162607s.jpg "Perennial Postage Dies [ 162607 ]")
![Adhesive Backed Sparkle Gems [ 161288 ]](https://assets1.tamsnetwork.com/images/EC042017NF/161288s.jpg "Adhesive Backed Sparkle Gems [ 161288 ]")
![Mini Glue Dots [ 103683 ]](https://assets1.tamsnetwork.com/images/EC042017NF/103683s.jpg "Mini Glue Dots [ 103683 ]")


![Coastal Cabana 8-1/2" X 11" Cardstock [ 131297 ]](https://assets1.tamsnetwork.com/images/EC042017NF/131297s.jpg "Coastal Cabana 8-1/2\" X 11\" Cardstock [ 131297 ]")
![Nests Of Winter 12" X 12" (30.5 X 30.5 Cm) Designer Series Paper [ 164183 ]](https://assets1.tamsnetwork.com/images/EC042017NF/164183s.jpg "Nests Of Winter 12\" X 12\" (30.5 X 30.5 Cm) Designer Series Paper [ 164183 ]")
![Winterly Tree Tops Bundle (English) [ 164066 ]](https://assets1.tamsnetwork.com/images/EC042017NF/164066s.jpg "Winterly Tree Tops Bundle (English) [ 164066 ]")
![Unbounded Love Bundle (English) [ 163384 ]](https://assets1.tamsnetwork.com/images/EC042017NF/163384s.jpg "Unbounded Love Bundle (English) [ 163384 ]")
![Coastal Cabana Classic Stampin' Pad [ 147097 ]](https://assets1.tamsnetwork.com/images/EC042017NF/147097s.jpg "Coastal Cabana Classic Stampin' Pad [ 147097 ]")
![Earth Tones Shimmer Gems [ 164070 ]](https://assets1.tamsnetwork.com/images/EC042017NF/164070s.jpg "Earth Tones Shimmer Gems [ 164070 ]")
![Clear Wink Of Stella Glitter Brush [ 141897 ]](https://assets1.tamsnetwork.com/images/EC042017NF/141897s.jpg "Clear Wink Of Stella Glitter Brush [ 141897 ]")
![Paper Snips [ 103579 ]](https://assets1.tamsnetwork.com/images/EC042017NF/103579s.jpg "Paper Snips [ 103579 ]")


